Showing posts with label Artbooking. Show all posts

Monday, June 24, 2019

H2H You Are My Sunshine

Today over at Heart2Heart we are are incorporating some sunshine on our projects! We can't wait to see what you come up with for this one. 


When I saw this stamp set I knew right away I had to have it as I love vintage campers and it is on my list to one day own one. 


Supplies
all CTMH unless otherwise noted

Cardstock - White Daisy, Lemon
Paper - Mix in Paper Packet
Ink - Black, Pixie
Stamps - Happy Trails
 ShinHan Touch Twin Markers - Turquoise Blue, Leaf Green, Light Orange, Clay, Pastel Green
Other - Happy Trails Thin Cut, Artbooking Cricut Cartridge, Clear Gems


Please join us and share your challenge over at H2H by June 30.

Monday, February 18, 2019

H2H Invitation Only

Invitation Only!!

Over at Heart 2 Heart this week we are extending some invitations. At first you might just think about a wedding invitation or a birthday invitation however there are so many other fun things that you can use invitations for.

Weddings
Showers
Birthdays
BBQs
Dinner Party
Girls Night
Card Night
A Weekend Getaway
Book Club (that is what I did :))
Spa Party
Tea Party

The list is just endless. Decide what you want to get together and do and have fun making some cute invitations.


I used some more of my Something Fierce Kit to make up a bookmark, with hand lettering, and a matching card. I just cannot get enough of that paper pack.


I used the fun torn paper file from the Artbooking cartridge but you could also use the Thin Cut Borders for this. I found the book club cut in Design Space.


I used some gems and popped up my book-club invite to give it a little something extra.


Here is a simple matching book mark that everyone will receive when they come to book club. 

I hope you will join us this month at H2H and make sure you take a look at what the other designers came up with.

Monday, October 29, 2018

H2H - Pumpkin Spice

Pumpkin Spice and everything nice


I can't remember exactly when it happened but pumpkin season has become a big thing, I mean a really BIG thing! You know what I am talking about, before summer is even over people start going gaga for pumpkin everything...pumpkin latte, pancakes, cookies, pie, oatmeal, even pumpkin beer. Whoa...

You guys...I have a confession...

Pumpkin isn't my jam!

I know, I know, how can I live in the Midwest and love fall and not love it? I just don't. Every year I try a bite of pumpkin pie...nope still not a fan. I have tried the pumpkin beer it was ok but I wouldn't drink one again. I do like pumpkin spice bars...those are yummy.

Anyway I want to like it, I try it here and there but it just isn't my thing. I do love to go to the pumpkin patch! This past year we hit up the pumpkin patch really early but my little one went right before Halloween with her grandparents  so this week I decided to feature our pumpkin carving adventure and Halloween. Make sure you head on over to the Heart 2 Heart blog this week to check out Pumpkin Spice challenge.


I am still working up a storm in my 2017 Pocket Page Album. I had so much fun with these pages. I know I mentioned last week that I sometimes use these smaller Pocket Plus Memory Protectors to make a busy week bigger and here is an example of that. 


I pulled out an old favorite the Artbooking Cartridge to make a lot of the details for each pocket. They have a really fun Halloween section. I used it for the round Halloween, the spider web, the film strip, the "trick or treat" the moon and the fence. I love how DS allows me to change the sizes on everything to make it fit to just the right size.


I didn't use it as much here I used it for the web frame and I also used the font from Artistry for "week 44".


I really enjoy making my own cards. I just add a little detail here and there and they all just kind of come together.


Here you can see some of the details a little better.


I also used the new Thin Cut Decorative Borders here with the paper tare at the top of this card.

And here on the little stitched scallop. I hand cut the banners. I also have Thin Cut Decorative Boarder stitching on the orange piece but it is hard to see.


I hope you enjoyed these pages. Make sure you stop on over to the H@H blog and show us what you come up with.


Tuesday, January 12, 2016

DD8...the mail

Did you think I had forgotten about finishing this up? I didn't. I just ran into a few issues...like getting sick and then on top of that getting the flu x3! My little one got it first and shared it with the rest of the family. Yikes it was brutal which meant instead of doing a lot of scrapbooking over my break (I am lucky to get time off at Christmas through New Years) I spent it recovering.

Anyway you don't want to hear about that. Today's page is a 3 x 8 and has a little bracket on the edge so it is just a little half page.

 
I just wanted to tell a quick little bit about getting my cards out in the mail. I also got to use up this fun little button that my mom gave me last year or maybe the year before that. She got them from JC Penny's I just popped the back off and added a pop dot. I thought it went well with this old Jingle paper that I had. That little round hohoho came from Stitch in Time again. Come back again for tomorrows story...it is a doozy!

Saturday, December 12, 2015

DD2 a not so Christmas Diorama

So todays was almost a regular day except the part where I found out that my little one had a diorama due on Friday. Say what??? Apparently I found out about this way back in early November when we had conferences. I really really don't remember anything about it.

After a lot of panic and looking around on pinterest I remembered that I had won these giant stickers at a crop a while back that featured Little Red Ridinghood. Day saved...so here are a few photos from that and a little journaling. Not to exciting here on day 2.

This

is

real

life...

mom life. Ha

Here you can see my #1 from day one and surprise that thing behind it was a little sticker tree on a half page. Those stickers are from one million years ago. I have a few old Simply Scraping kits from Stampin' Up!

see.. using up  my stash yay me!

 
I was going for a washi tape tree look. I also dug out some of my old sparkly thickers...I love those things.

 
Here is my page without being able to see part of page 3.


This is not the first time scrapbooking supplies have saved my rear end and I know it won't be the last time either!!!

Friday, December 11, 2015

DD1 The Tree

Look at me blogging two days in a row!

This is actually going to be a regular thing as I work through my December Daily this month. I am trying to work on it every day but in reality I have been snapping photos and finding my stories and then working on them on Sundays when I have the house all to myself.

Here is my day one page

This page is all about picking out our tree. We were able to find the perfect one and it was really cute because my little one reminded me how important special memories can be. As we were talking all about it she remembered how last year we were able to get hot chocolate and said she was looking forward to it because it was our tradition and it was her favorite!

Awwww melting mama heart right here.

The # 1 is in a clear pouch and you can see through to page two. Since you could see through I wanted to put something cute behind it. You will see more of what it is in tomorrows post. I also used my Artbooking cartridge again and used an overlay and made that cute little bow. That was pretty fun.

 
I had some wood veneers that I got last Christmas and that cute little tag came from another set of  freebies from the Stitch in Time blog...again go check Marie out if you have not had a chance to yet.


 I also had several photos I wanted to add on this page so I added these little 2" x 2" flip flaps


Thursday, December 10, 2015

December Daily 2015

Hi everyone, I have been super busy cleaning up my studio...I know I know it is never ending. I think I have it in a good place right now I can get in there and work and enjoy my space. sometime in the near future I will do another studio tour but lately I have been thinking all about the December Daily, I know it is already the 10th but I figured I will show you what I have so far and try and get caught up.

Are you working on one? I have wanted to do it for years but have never really understood it. Last year I considered it and was going to buy the kit...WOW was it pricey. I passed. As you know I have been listening to the Scrap Gals podcast and they explained things a lot better.

#1 I don't have to buy the kit to do it
#2 The original idea was to use your stash

Hmmm #2 really got my attention I am like many scrappers and have a big giant stash. So while I was cleaning my room I started setting stuff aside and it was not long before I knew I had a big enough stash to do a December Daily this year.

Here is my front page or my introduction page if you will. I picked up this calendar from Marie Lottermoser over at the Stitch in Time blog if you have never seen her December Daily books for the past few years you need to drop everything and run over there...oh mu gosh so beautiful!!! I also am getting some good use out of my cricut. My Artbooking cartridge from CTMH is the front page here with December along the side. I cut it twice once on red card stock and once on glitter paper. Love love love it.

Thursday, October 23, 2014

A Fish Tale

A while back my mom came over to tell me a whopper fish tale only it was actually true she went fishing and caught a giant fish! The funniest part of the story was her boyfriend only caught a fish about the size of a minnow. Hahaha

Anyway she wanted me to make a scrapbook for her. I was going to use the Timberline Kit because I thought it was perfect for fishing. Well when I saw all of the photos it just wasn't a fit. So I set them aside, and they sat and sat and sat. As you may know I am trying to use up my papers and I came across the WOTG Kit Tommy. WOW can you say perfect fit? Wait until you see this...

Here is the cover it is just a  Koozie that I cut down

I found this album on a garage sale table for $1 and it was full of page protectors. So I scrapbooked the best photos of the 50 my mom gave me and put rest throughout the pages and it just turned out perfect.

I made this mat with the Artbooking cartridge


Apparently they had to get a fishing licence for a  day so here is my mom overlooking the water and that little tab above her head pulls out

 
See - pretty nifty that opens up

 
Here is one of my favorite pages love how the embellishments came together


Here is a photo of that giant fish I was talking about hahahah note the arrow pointing it out


The captain even cut and cleaned the fish for them.

 
The whole gang...it sure looks like a fun day.

 
The best part of using WOTG's is how much you have leftover...


Wait until you see all the cards I  made, I will share them in the next week or so.

Do you like to make mini albums?
 
Supplies used - Tommy WOTG & Artbooking

Monday, October 13, 2014

Back to my roots

So earlier this month it was World Cardmaking Day. Did you make any cards? I did! I made a few cards and a Christmas present. I am not quite ready to share that yet but I will share the cards. Once I was done I realized I did not use any pattern paper...what? I guess I just went back to my roots for the day. Once upon a time I was a Stampin' Up! Demonstrator, that seems like a million years ago. Anyway when I was with them I never ever used pattern paper it almost seemed like I was cheating on the rubber. Haha, now these days you see Stampin' Up! Demos using pattern paper in their designs but that just shows you how the crafting world has changed.

Anyway the cards...


As I was playing with the marvelous hostess only stamp set Thanksgiving Wreath I was just itching to do some random stamping and create my own back ground...so I did.


Oooooohhhhh....ahhhhh random stamping super fun!


The secret to random stamping - stamp in triangles and turn the image a 1/4" every time. I learned that from my friend Patti (Stamping Yoda) who used to be my SU Demo. We are still great friends 10 years later...just another reason I LOVE papercrafting.

 
What do you think? I also did a nifty little paper sanding trick since our paper is white core. I scored those lines at a 1/2" and then sanded over them. Perdy!

Ok now onto card #2 I just really love this tree in Artbooking and so I made several and then I had a lot of tree's and a lot of leaves. (gift hint: I used a bunch there too) Anyway I wanted to try the tree without the outline and here is what I came up with.


I actually glued those into each spot using the outline of the tree and then I just removed it. I pieced the background together first, the grass, sky, and clouds.

Finally I added this little thanks I think it looks a little like it is hanging on the tree, if it were a little bigger it might look like it was carved on there.

Anyway I hope you enjoyed my little trip down memory lane and if you stamped on World Cardmaking Day I would love to see what you came up with.

Supplies*:
Cardstock - Campaign (X5931), Cocoa (X5642), White Daisy (1385), Olive (1245), Autumn Terracotta (1270) Barn Red (X5637), Lagoon (X5762), Goldrush (1243)
Ink - Olive (Z2137), Barn Red (Z2104), Autumn Terracotta (Z2101), Goldrush (Z2123)
Stamp Sets - Thanksgiving Wreath (B1454)Embellishments - Sparkles Brown & Tan Assortment (Z1753), Olive BradOther - Artiste (Z1790), Artbooking (Z1906)
*All supplies are from Close to my Heart unless otherwise noted.


You can find these Close to my Heart products at Jessica's CTMH store. Don't forget to check out the rest of the design teams blogs throughout the week. You can find a link in the sidebar.

Monday, September 15, 2014

Spoooooooooky

Are you scared? Don't be it is a cute kind of Spooky!

I have been wanting to try a tone on tone card for a while now. I always see people do it and then either forget about it or don't think I can pull it off.  Now that I pulled it together and tried it I know I will be trying it again! I really like how it came out.

I took an overlay from the Artbooking cartridge and cut it down to fit on my 4 1/4" x 5 1/2" standard card base. I cut it at 5 3/4" originally I was thinking I might do a sqare card but decided against it. I made spooky 7 1/2" because at 5 3/4" it was a little smaller than I wanted it. Don't forget on the Artbooking cartridge everything is meant to go together that is why it is set so large. I could have also set the real dial size to 1 1/2".  Then I added the little tag flag in the corner and fancy...and boy do I mean fancy cut the spider out. Wala...this card came together in a snap.

Here is the inside.


I will leave you with a little closer up view of the front of the card. I hope you have a great day! Get out there and make some spooky cards of your own!


Supplies*:Cardstock - White Daisy (1385)
Pattern Paper - Scaredy Cat (X7185B)
Complements - Scaredy Cat (X7185C)
Cricut Cartridge - Artbooking (Z1686)
*All supplies are from Close to my Heart unless otherwise noted.
You can find these Close to my Heart products at Jessica's CTMH store. Don't forget to check out the rest of the design teams blogs throughout the week. You can find a link in the sidebar.

Monday, August 25, 2014

Back to School

We went back to school this week. I thought I would make this cute card for my little one to celebrate. She is still young enough where back to school is still super duper!

As I was trying to get some inspiration for this card I was flipping though old idea books and came across one from the Autumn/Winter 2013/2014 Idea Book on page 104. Even though I am thinking about back to school and it is a wood grain I liked it. I started thinking and playing around with ideas and here is what I came up with.

I really liked the idea of an overlay and I was originally going to stick with the wood-grain since pencils and desks are wood and apples grow on trees...anyway I decided the alpha was more school like so I went with that. Glad I did cause it is perfect for what I was going for!

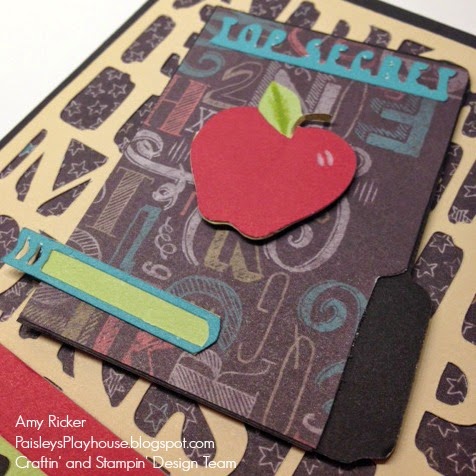
The overlay, the apple, the folder and all the text came from the CTMH Artbooking cartridge. See it isn't just for scrapbook pages.

This card actually has no stamping on it. It is rare that I make cards like that but I enjoy doing something a little different now and then.

I actually cut the apple out twice once in Pear (ha) and once in Ruby. I cut off the leaf and colored the stem with some colored pencils. I layered the apple and popped it up.

Here you can see the close of up the little file folder. I originally planned to put something inside but I really couldn't come up with any ideas so I sealed it shut...besides it says right there that it is Top Secret!

You have a better view of the apple here. Oh yes I also added some highlights to it as well.


I almost always finish up the insides of my cards. This time I added a second little apple and cut out the words First day.

I did the same thing to this apple and tucked it under the words. I also trimmed this arrow so that it functioned as a paperclip. Never be afraid to change up the images or cut them apart.


Enjoy

Supplies*:Cardstock - Champagne (X5931), Black (1386), Lagoon (X5762), Ruby (X5927), Pear (X5764)
Pattern Paper - Chalk It Up (X7184B)
Cricut Cartridges - Artbooking (Z1906)
*All supplies are from Close to my Heart unless otherwise noted.

You can find all of these awesome Close to my Heart products at Jessica's CTMH store. Don't forget to check out the rest of the design teams blogs throughout the week. You can find a link in the sidebar.