Tuesday, July 31, 2012

Express Yourself with Sparkle

Over at Practical Scrappers we are letting our light shine. Stickles, Bling, Gems...I decided on stickles. I had this cute premade title and I just wanted to help it pop. 


So I added some stickles and now it shines at every angle.  It just adds that something extra and brings a little girly stuff to an otherwise masculine color scheme.


Go ahead and express yourself with bling this week! 

Monday, July 23, 2012

Fun with Pins

At Practical Scrapers we are showing you fun ways to use pins on Cards and Layouts. I have been trying to figure out what in the world to do with these photo's of my daughter on the last day of school for about a month. Last week I decided to slide into the last few weeks of Got Sketch's latest class Express 3. When I {heart} it when that happens. 

These photo's are from my daughters last day of school Sophomore year. I have no idea where the time has went but these papers from Close to my Heart called Notebook are just perfect. Now I have had this paper in my bin for oh...about 3 or 4 years. I really am trying to be better about using it when I buy it.  So grab some of your stash and go check out what everyone else did with pins and then get busy making something beautiful. 


Here is a great tip on on how to attach the pins to your layouts and cards. Just use a pop dot or some foam tape and stick the tip of the pin inside. This will give you extra dimension and a place to put your pin. 


As you can see I have one of the pins under and one over they are both stuck into foam tape.


I also wanted to give you a view of the banner boarder. I adore banners and that is a trend that I hope doesn't end anytime soon.


To get the layered look of the banner I put my adhesive down in a strip using a adhesive tape gun. The strip is about 1/4" so then I cut out all of the banners on my Cricut and stuck each one down at the top. After that I just fluffed or rolled up the bottom. This gave it a added dimension without giving it any bulk. This is one of my favorite techniques. You can also do that with flowers and butterflies.


Sunday, July 22, 2012

Sketch-n-Scrap # 13 - Joy

Sketch 13 is here from Sketch-n-Scrap isn't it a beauty and lots of photo's on this one. I love sketches when I can get a lot of photo's on. Often if I love a design I will change out the number of photo's if it only has one or two. I stayed pretty true to the sketch changing around the photo size a little and I also swapped the title and the accent at the bottom. Something else that I decided to do with this sketch is to turn it from a one page to a two page again. This time instead of coming up with something similar or stretch the sketch I am turning two single sketches into a double sketch. I coordinated this page to go with my sketch 12. Take a look here. As you can see I did some more fancy cutting on this page. 


I cut out a butterfly and two small flowers here. I put a glue dot down in the middle of the butterfly and pulled the wings up. I love doing this because it makes the butterfly look like there is some movement.


Here I cut the hexagons apart and lined them up all in a row and added some pearls to the centers. I also cut that large flower.


You can see here that I tried to flip up the flower petals as well. Just giving a little more dimension without making my page to thick. 


I hope you can take the time to play along this week at Sketch-n-Scrap. Head on over to see what everyone else is doing and hear about some great changes.

Supplies
Cardstock - Bamboo
Pattern Paper - Pemberley
Embelishments - Bitty Opaques Pearl Gems, Thickers Alphabet


Monday, July 9, 2012

Something Old...Something New...

Well even though my page is about a flower girl it isn't about that kind of flower girl. You maybe be wondering where the something old and something new come in? Well I am still working on scrapping my stash and I used one of my favorite older paper lines Mayberry. Practical Scrappers are all about scrapping your stash so I was so happy to be able to use something old for my very first assignment which was stamping on layouts or cards. Make sure you stop over and see what everyone else came up with.

I love these photo's of my youngest on my back deck. I have been stuck on these photo's for a while because they are some of my favorites I wanted to scrap them in a way that they really stood out. As I was getting ready for my assignment I flipped though a few idea books and then I flipped though my sketches. I cam across this great sketch from one of my favorite sources - Valerie Salmon over at Got Sketch

I decided to stamp on pattern paper. This is a technique that I love but I often forget about. It is fun it is simple and it is adorable. 


Here you can see them close up. You can also see these cute felt letters that I love so much. 


I also stamped some words and cut them apart. This is a great way to add journalling exactly where you need to without worrying about it being the wrong size.


Here is a last look.


Supplies*
Cardstock - Olive, Cocoa
Pattern Paper - Mayberry
Stamps - Card Word Puzzle
Ink - Cocoa
Embellishments - Evergreen Cork Shapes, Pearls, Keepsake Felt Alphabet
Other - Martha Steward Punch, Paper Snips, Glue Dots

*all supplies CTMH unless otherwise noted


Sunday, July 8, 2012

Twice in one day...

is unheard of I know. First I don't post for ever and ever and now a double header. I couldn't help it my mojo is back. It is my last vacation day today and I want to clean the house and get laundry done so instead I am scrapbooking. Bwa ha ha ha! 

I also have been meaning to participate in real time over at Sketch-n-Scrap not just doing the sketches after the fact. This weeks sketch had to be posted today so I sat down and got busy. Have you played along over there yet? The sketches are awesome so go give it a chance you will be glad you did.


I cannot tell you how happy I am to be creating again. I used the Dotty for You paper pack that CTMH gave away during National Scrapbook month. I thought it was fun playful and colorful...sort of like sidewalk chalk! I followed the sketch pretty close I just changed out the photo size. I was going to turn it but this way ended up working for me.


Here is a close up of the butterflies. When I was showing my little one she said awwww then I touched one of them and then of course she had to do it too. She said "I wanna make the butterfly fly" it was so sweet. 

Well what are you waiting for...grab the sketch and enter your page. They have great monthly sponsors as well so you might even win a prize. If not you will have another page done and a cute one at that.


Call me Mayberry

I have been playing with one of my favorite paper packs. Mayberry. When this came out even though I loved it so I never bought it. I am always trying to use my stash but at this point in time I was also on a in a no buy zone. Haha! This happens a lot with a family...school, sports, ever growing bodies. Anyway I was able to pick it up with one of CTMH's great specials.

Here is my card I used Card Word Puzzle & Card Chatter-Birthday

Just a simple fun birthday card using Mojo Mondays latest sketch 248 


I popped up both the flower and the butterfly. I love to make the butterflies look like they are in motion on my cards or pages. To do that just bend them in the middle and put a little pop tape under the outer wings.


The inside of the card was kept super simple. 

I also wanted to mention that CTMH is having a fabulous special this month to help you get some of that old paper that maybe you didn't buy for one reason or another. Place an online order of $75 or more in July and we’ll send you a popular paper packet and coordinating accessory—a Perfect Pair—for free! Different Perfect Pairs are available on different dates throughout the month so you’ll want to place more than one qualifying order to snatch several Perfect Pairs.

ORDER DATESPERFECT PAIRRETAIL VALUE
July 1–5Mischief Paper Packet (X7144B) and Midnight Felt Shapes (Z1462)$15.90
July 6–10Dreamin’ Paper Packet (X7142B) and Harvest Charms (Z1633)$14.90
July 11–15Fanfare Paper Packet (X7138B) and Fanfare Level 2 Assortment (Z1400)$17.90
July 16–20Lucky Paper Packet (X7137B) and Lucky My Stickease® Assortment (X7137C)$17.90
July 21–25Mayberry Paper Packet (X7136B) and Mayberry My Stickease® Assortment (X7136C)$17.90
July 26–29Sophia Paper Packet (X7131B) and Sophia My Stickease® Assortment (X7131C)$17.90
July 30–31Believe Paper Packet (X7145B) and Holiday Pockets (Z1486) OR Wonderland Paper Packet (X7146B) and Wonderland My Stickease® Assortment (X7146C)$14.90
*Taxes and additional shipping/handling may apply. Offer good during above-specified dates, while supplies last.


Friday, July 6, 2012

Last Hero

So I used it all up..my Superhero paper. How I loved that kit. When I first say it I thought oh this is cute but what would I do with it...I have all girls. Well I did plenty. Cards, scrapbook mini album, 4th of July wreath. In the end I am so glad that I got it and am sad that it is gone.

Here are the cards that I finished it off with. This time I paired it up with the Born to Ride stamp set.


 Have you ever ended up with paper that you didn't know what you would do with and then found it to be one of your favorites?

Wednesday, July 4, 2012

A CASE for a Hero

I like to use up my papers once I make a few projects I finish up a paper packet with smaller projects usually cards. Here are a few cards that I started to CASE but make a few changes here and there. 


The first card is one the I saw on Pinterest made by Angel. I changed up quite a few things and in the end I made my card a little simpler than hers.


Here is the inside.


The next card I cased was from the very so talented Vicki Wizniuk. I changed out the papers as well as tilted my image. 


I left the inside of this one blank.


Do you case cards? If so do you keep everything the same or just use it as a starting point?

Supplies
Cardstock - Moonstruck, Sky, Black, White Daisy
Pattern Paper- Superhero 
Embellishments- Bakers Twine, Foundry Binder Clips, Comic Badge Buttons
Ink- Black
Stamps- Super Power
Copics


Monday, July 2, 2012

Stars...stars...and more stars

Last year I saw a wreath with all stars on pinterest for Christmas and I decided I needed to make one for the 4th of July. Well guess what...I never got any farther than making a few stars and gluing the stars down to the wreath. When I moved I saw it mocking me and I thought to myself maybe I will finish it. That was that. Well then my daughter mocked me and I knew I just needed to finish what I started over a year ago even if we only get to enjoy it on our door for two days. 


If you want to make on for yourself I will show you how. First I took a chipboard circle from CTMH and cut out these blue stars to adhere the stars on. In the original 


I decided that I didn't like the way it looked with the stars I had done so I added some more paper rosettes  and I thought the super hero paper from CTMH would be perfect! Well that paper was perfect and I love how the rosettes turned out. When making rosettes you want to take a strip of paper that is 1 3/4" x 12" and then score it every 1/4" then fold it back and forth.


Then they will look more like this.


Glue the ends with adhesive and they look sort of like little cups.


Push the center down and add some very strong adhesive. I used a glue gun. It also helps if you hold it together with a circle. It just makes it stronger. I do this to both sides.


Now I was ready to stick everything down to my wreath...but...I am a stickler for colors and making sure they match. Well guess what my original stars didn't match. I tried to pretend they did but in the end I knew it would but me every time I hung up my wreath so I decided to make some more stars. This is actually good for you as now you can see how I made the stars as I didn't have photos from the ones I made a year ago.


I cut out my stars with my Art Philosophy cartridge on my Cricut. Once you have your stars you will want to score each on from tip to inside tip. Once you do that on each one you fold the stars up so they look like this.


Once I did that I just layered the rosettes and the stars. I also added some little spirals, buttons and bling. I stuck everything down with a glue gun and love the way it turned out. 


I hope you enjoyed the project and if you start one please know that it only took a few hours to complete so it really shouldn't take you a whole year to make it. 


I finally have great timing on a seasonal project and am super excited to have just made this project only to find out that I can share it over at Exploring Cricut and over at Heart2Heart. I hope you can also play along at one or the other...or even better BOTH!


Supplies
Cardstock -  Blue for the base that I had on hand. Cranberry - CTMH
Pattern Paper - Superhereo
Other - Art Philosophy Cartridge, Bling, random buttons


Sunday, July 1, 2012

Exciting NEWS and Keeping Cool

So guess what I did. I decided to jump back out there in the scrapbook world and apply for a design team. I was pretty nervous when I saw the awesome work that is featured on their blog but decided to just go for it. Going for it is actually how I try and live my life. Sometimes I find myself thinking I am not good enough for this or that or not pretty enough or not thin enough but a few years ago I decided that I am who I am. I also want my girls to be confident and you know as much as you say to kids it is your actions that speak so loudly. So now I just try to believe in myself and when I am feeling nervous or not good enough I just suck it up and put on a smile and let life happen. You know what usually happens??? Dreams come true. I find that I am good enough and doors open and opportunity happens. 

Back to applying to the design team! I applied and guess what I am now a happy designer over at Practical Scrappers! I am joining a great team and am already having a fun time getting to know the other super talented designers. Look for my first assignment in the upcoming weeks. In the mean time make sure you go and check them out and follow their blog. 

Now some tips on keeping cool...let me tell you it involves an ice cream man and a yummy Sponge Bob on a stick!


A friend of mine Lisa has started a cool sketch blog. If you have been around this blog before you know that I love sketches. I was so happy to hear that she is working with another friend on a blog dedicated to sketches. She has been making sketches for years. If you like to be challenged and you like sketches go check them out Sketch-n-Scrap

The sketch was only a one pager so I made this page myself to go along with the sketch page.


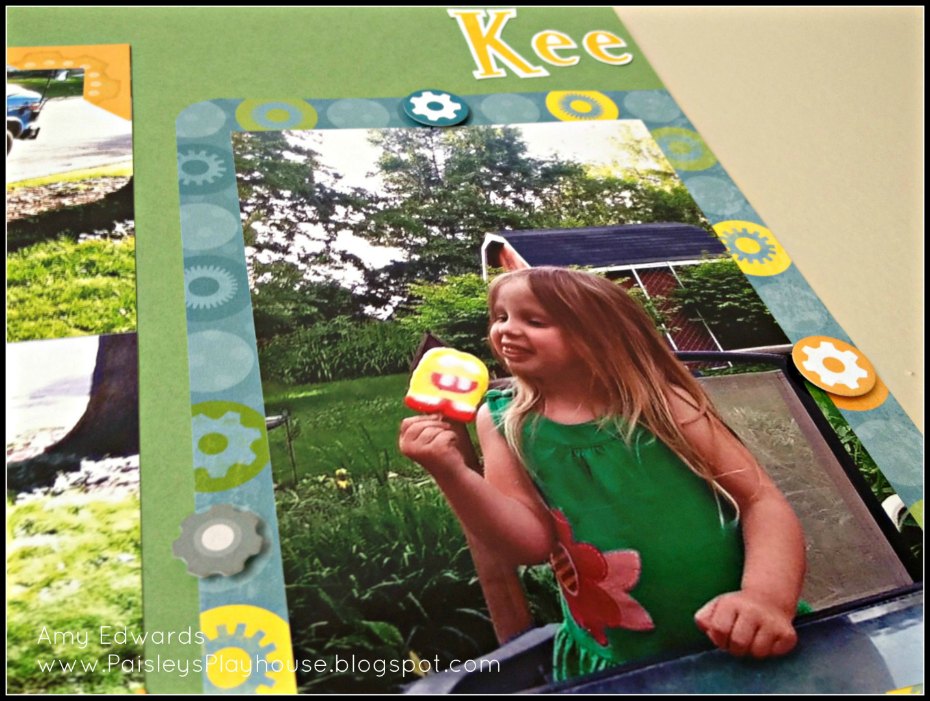
Here is a close up and you can see I popped up some of the stickers. 


Here is the other part of my two pager and this is the one that came from the sketch. I know I featured a pin wheel a few posts ago. They are just so fun and really go great on a summer page. Have you had the chance to make one yet?


Here is another close up. You can see that I stamped the title and cut it out. I thought about leaving it together on some white cardstock but I always like the titles better cut apart.He


Here is a close up of the journaling, it is so fun to cut it apart. It also makes it nice because you can change it around to fit the space that you have set aside. 


I also did some stamping on the arrow sticker. 


Here is the sketch itself you can see that I didn't really change much. If you get the chance play along I hear they have some great prize opportunities.


Supplies - using up my CTMH stash
Cardstock - Wasabi - SU, White Daisy - CTMH
Pattern paper - Tinkerin' - CTMH
Ink - Sunflower Ink, Olive green marker
Stickers - My Stickease - CTMH
Stamps - Cocktail Alpha, A Typeface - CTMH
Embelishments- Bakers Twine Paradise Assortment - CTMH, Green Button