Showing posts with label Practical Scrappers. Show all posts

Tuesday, October 23, 2012

Foam Adhesive is good for...

so many things. Over at Practical Scrappers today you will find 10 great ideas for foam adhesive. I decided to use it to pop up stamped images. First I pulled out another one of these swing cards from the Cricuit Artiste Cartridge (I cannot get enough of that thing) and then I did some random stamping. The random stamping might look familiar because I was so inspired by Vicki Wizniuk's post  on random stamping last year that I pinned it and remembered that I needed to use that color scheme and try to make something as beautiful....I hope I succeeded,


I also used the Art Philosophy to cut the parts of the cards...the acorns and the label shape. I don't know about you but the one cartridge has made me use the other so much more than i ever did before. They work together like two peas in a pod.


Monday, October 15, 2012

Scrap Happenings

Greetings. I have a few shares for you today. A new sketch over at Sketch-n-Scrap and a bunch of banner fun over at Practical Scrappers.  I hope you take time to visit both blogs for tons more inspiration today!


Have a great week and do something scrapper!

Monday, October 8, 2012

Owl see a witch

I don't know why but I really love to make Halloween cards. I think it brings out the kid in me. Today over at Practical Scrappers they are scaring up some cards and layouts. Here is mine - yes another swing card. I just love those too. LOL I am becoming a little predictable. I will have to try something new in the near future.


Here is the inside of the card.


and then the little side view. Isn't that tulle ribbon so cute? I have never ever worked with it before. It was pretty fun.


Tuesday, September 18, 2012

Flower Power

How about a fun card that is super cute but involves NO stamping...what? Yep there is no stamping on this card. I used a flower punch, some pattern paper, and some doodling.

Once I punched out the flowers I popped them up and put some pattern paper behind them. I felt like it needed a little more so I doodled around each flower to make them pop a little. I added some sparkle centers and some of this great new glitter ribbon and ended up with a happy fast card that is perfect for any occassion.

To see what else you can do with flower punches please go visit Practical Scrappers.


Monday, September 10, 2012

Hexagons + Big Cards + Photo's = oh my...

[edited: octagons...I am really having a Monday today. I really do know my shapes.]

Hi everyone sorry I have been a little MIA I have been making some more great projects and just winding down from summer. I think I have gotten into a pretty good routine so you should see me around several times a week. Yesterday was grandparents day.  Over at Heart 2 Heart this week they are talking about BIG cards...last week it was all about the mini but this week we are going big. I thought it would be fun to make a big card for Grandparents Day yesterday because we all know how BIG an impact grandma's and grandpa's have on our lives.  At Practical Scrappers they are talking Hexagons...they are all the rage. I love them you might love them it seems like everyone loves them! I was trying to figure out where I could get a pattern and cut them by hand and then I discovered that I have a hexagon shape on my potpourri cricut cartridge...have I mentioned how much I {heart} my cricut lately?

Here is my card. I decided to get out my Stella paper pack and enjoy the cooler fall like weather we have been having.


I feel like no card for a grandparent would be complete without some smiling faces...so surprise this is a photo card!


Here are my three beauties a few months ago. I feel like I can never get all of them to look and smile at the camera at the same time. 


I am really in love with the colors in this card and thought I would just give you a close up of those Mocha Gems. I also did some faux hand-stitching around the edges both inside and outside.


I hope you feel inspired this week to play with hexagons, make a BIG card, or add some photo's to your next creation. 

Tuesday, September 4, 2012

Fall Favorites - Easel Style

 
Practical Scrappers is featuring A2 cards. This is the most common card that us cardmakers make. Well go check out all the ways that you can take a spin on this basic card.

I often will come up with a card or an image that I just fall in love with. I want the recipient to be albe to display it or just make it seem a little more special. That can happen with an easel card. Easel cards are one of my favorites to make.
You just score a basic card at  5 1/2" and again at 8 1/4" From there you can attach a piece of cardstock to the bottom fold as you can see below. I also use pop dots to pop up the sentiment so that the easel part has something to lean agains.
 
I hope you are able to try making one soon! If you do let me know what you think.
 
Supplies:
Cardstock: White Daisy, Ruby
Paper Pack: Moonlight
Stamps: Fall Favorites
Ink: Black, Olive
Embelishments: Burlap, Buttons
Markers:Olive, Indian Corn Blue, Ruby, Autumn Terracotta, E57, V99, Y21

Monday, August 20, 2012

Back to School

Ah...school starts next week and so I have been trying to wrap my head around that. It has not worked yet but with a little nudge from Practical Scrappers I decided to finally work on my pages from the Got Sketch School class I took a while back.

My little one is still in pre-school and my game plan is to work on this album so that each year I just have to add photo's. This will be awesome cause my middle daughter is starting her senior year and I was looking through her school album yesterday and I am still way back in middle school - yikes!!! Better catch that up so I can have it ready for her graduation party which will be here before I know it.

Now I normally would have just shown you the one side since I have all the faces blocked out on the other page but I wanted to show you this fabulous pocket! Isn't that awesome - I can put papers or artwork in there.


Here is a close up of the left page. Her photo from the first day of school. I take one of the last day as well. I also wrote about her favorite things and what she is learning. I still need to have her write her name on the space below.

If you need a nudge to get back into the swing of things or if you just want to get some fun back to school ideas head on over to Practical Scrappers where you can get a whole bunch of great ideas today!

Tuesday, July 31, 2012

Express Yourself with Sparkle

Over at Practical Scrappers we are letting our light shine. Stickles, Bling, Gems...I decided on stickles. I had this cute premade title and I just wanted to help it pop. 


So I added some stickles and now it shines at every angle.  It just adds that something extra and brings a little girly stuff to an otherwise masculine color scheme.


Go ahead and express yourself with bling this week! 

Monday, July 23, 2012

Fun with Pins

At Practical Scrapers we are showing you fun ways to use pins on Cards and Layouts. I have been trying to figure out what in the world to do with these photo's of my daughter on the last day of school for about a month. Last week I decided to slide into the last few weeks of Got Sketch's latest class Express 3. When I {heart} it when that happens. 

These photo's are from my daughters last day of school Sophomore year. I have no idea where the time has went but these papers from Close to my Heart called Notebook are just perfect. Now I have had this paper in my bin for oh...about 3 or 4 years. I really am trying to be better about using it when I buy it.  So grab some of your stash and go check out what everyone else did with pins and then get busy making something beautiful. 


Here is a great tip on on how to attach the pins to your layouts and cards. Just use a pop dot or some foam tape and stick the tip of the pin inside. This will give you extra dimension and a place to put your pin. 


As you can see I have one of the pins under and one over they are both stuck into foam tape.


I also wanted to give you a view of the banner boarder. I adore banners and that is a trend that I hope doesn't end anytime soon.


To get the layered look of the banner I put my adhesive down in a strip using a adhesive tape gun. The strip is about 1/4" so then I cut out all of the banners on my Cricut and stuck each one down at the top. After that I just fluffed or rolled up the bottom. This gave it a added dimension without giving it any bulk. This is one of my favorite techniques. You can also do that with flowers and butterflies.


Monday, July 9, 2012

Something Old...Something New...

Well even though my page is about a flower girl it isn't about that kind of flower girl. You maybe be wondering where the something old and something new come in? Well I am still working on scrapping my stash and I used one of my favorite older paper lines Mayberry. Practical Scrappers are all about scrapping your stash so I was so happy to be able to use something old for my very first assignment which was stamping on layouts or cards. Make sure you stop over and see what everyone else came up with.

I love these photo's of my youngest on my back deck. I have been stuck on these photo's for a while because they are some of my favorites I wanted to scrap them in a way that they really stood out. As I was getting ready for my assignment I flipped though a few idea books and then I flipped though my sketches. I cam across this great sketch from one of my favorite sources - Valerie Salmon over at Got Sketch. 

I decided to stamp on pattern paper. This is a technique that I love but I often forget about. It is fun it is simple and it is adorable. 


Here you can see them close up. You can also see these cute felt letters that I love so much. 


I also stamped some words and cut them apart. This is a great way to add journalling exactly where you need to without worrying about it being the wrong size.


Here is a last look.


Supplies*
Cardstock - Olive, Cocoa
Pattern Paper - Mayberry
Stamps - Card Word Puzzle
Ink - Cocoa
Embellishments - Evergreen Cork Shapes, Pearls, Keepsake Felt Alphabet
Other - Martha Steward Punch, Paper Snips, Glue Dots

*all supplies CTMH unless otherwise noted


Sunday, July 1, 2012

Exciting NEWS and Keeping Cool

So guess what I did. I decided to jump back out there in the scrapbook world and apply for a design team. I was pretty nervous when I saw the awesome work that is featured on their blog but decided to just go for it. Going for it is actually how I try and live my life. Sometimes I find myself thinking I am not good enough for this or that or not pretty enough or not thin enough but a few years ago I decided that I am who I am. I also want my girls to be confident and you know as much as you say to kids it is your actions that speak so loudly. So now I just try to believe in myself and when I am feeling nervous or not good enough I just suck it up and put on a smile and let life happen. You know what usually happens??? Dreams come true. I find that I am good enough and doors open and opportunity happens. 

Back to applying to the design team! I applied and guess what I am now a happy designer over at Practical Scrappers! I am joining a great team and am already having a fun time getting to know the other super talented designers. Look for my first assignment in the upcoming weeks. In the mean time make sure you go and check them out and follow their blog. 

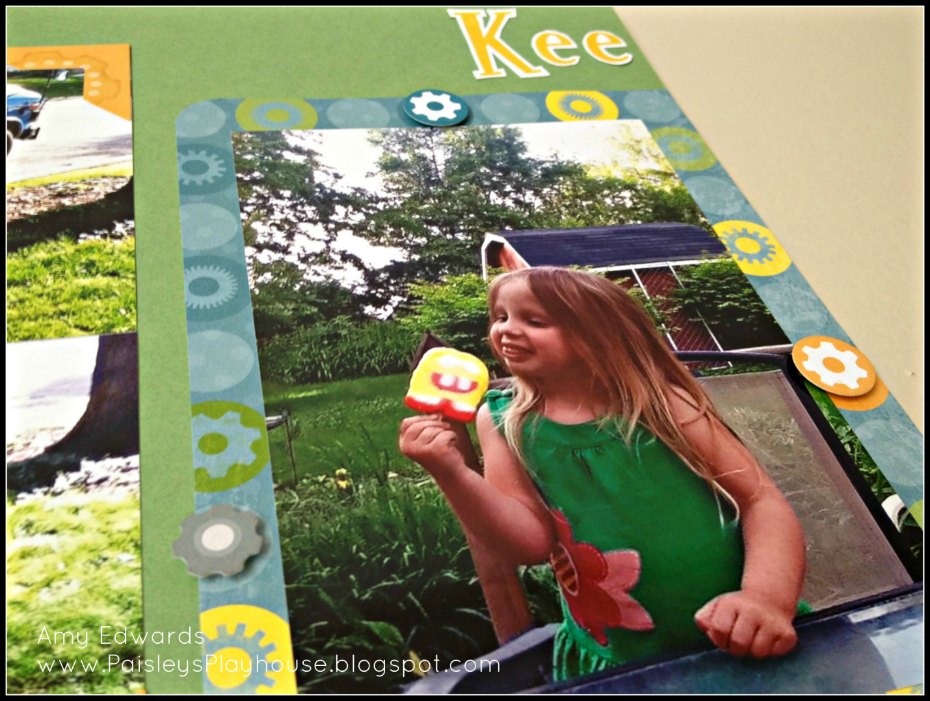
Now some tips on keeping cool...let me tell you it involves an ice cream man and a yummy Sponge Bob on a stick!


A friend of mine Lisa has started a cool sketch blog. If you have been around this blog before you know that I love sketches. I was so happy to hear that she is working with another friend on a blog dedicated to sketches. She has been making sketches for years. If you like to be challenged and you like sketches go check them out Sketch-n-Scrap

The sketch was only a one pager so I made this page myself to go along with the sketch page.


Here is a close up and you can see I popped up some of the stickers. 


Here is the other part of my two pager and this is the one that came from the sketch. I know I featured a pin wheel a few posts ago. They are just so fun and really go great on a summer page. Have you had the chance to make one yet?


Here is another close up. You can see that I stamped the title and cut it out. I thought about leaving it together on some white cardstock but I always like the titles better cut apart.He


Here is a close up of the journaling, it is so fun to cut it apart. It also makes it nice because you can change it around to fit the space that you have set aside. 


I also did some stamping on the arrow sticker. 


Here is the sketch itself you can see that I didn't really change much. If you get the chance play along I hear they have some great prize opportunities.


Supplies - using up my CTMH stash
Cardstock - Wasabi - SU, White Daisy - CTMH
Pattern paper - Tinkerin' - CTMH
Ink - Sunflower Ink, Olive green marker
Stickers - My Stickease - CTMH
Stamps - Cocktail Alpha, A Typeface - CTMH
Embelishments- Bakers Twine Paradise Assortment - CTMH, Green Button