Showing posts with label gifts. Show all posts

Thursday, November 16, 2017

Love and Marriage 4+ years later

You guys, it finally happened! My daughter finished her wedding album. Yay This past year they celebrated their 4 year anniversary, they have also had a little boy and a little girl since they said I Do.

Her album was one of her favorite gifts, she actually called me before I even got home from the reception (an hour away) to thank me. She has been working on filling it ever so slowly ever since.

Here it is.

The first page,

A little close up of the details


This page is a little busy but it was for something old, something new, something borrowed, something blue. I also love how she put up her dress with her bridesmaid dresses.


A page just for her


One for him too


I love way this page turned out with her bridesmaids.


The groomsmen all cleaned up so nicely.


Some moments from their ceremony


 and from their photo shoot


Family shots


She was not sure what she wanted to do here but it turned out perfect for the speeches


Their cake I already knew what it looked like so I made an embellishment that looked like it.


Their first dance


Friends and fun times from the photo booth at the reception


Now the party really starts


and then the night comes to an end


More kissing...


I made her invitations and some other things for her wedding that for some reason I did not take a photo of. I have to say this album was a lot of work but I loved making it and to know that they have this to remember their special day makes it all worth it.

Wednesday, August 5, 2015

Welcome to the world!

My daughter had her first baby recently!

Little Spencer...he is just perfect, and sweet, and beautiful, and I can just go on and on. Mom, Dad, and baby are all home and doing great.


I wanted to make him a special little name frame that matched his bedroom so I dug into my stash and found some Hooligans Paper from way back in the day. It was so old that I had to re-glue some of the cute little felt monsters back together. blushing...this is just a lesson to you all USE YOUR STASH.


I love the way it turned out! My daughter and son in law kept changing their minds (read daughter) on what the room was going to be. First it was going to be nautical, then outer space, he suggested monsters inc early on but she didn't want to do that.

So round and round she went pinning this and that. I of course knew I wanted to do a name frame all along so every time she would get a new plan I would go digging...LOL when she told me they went with monsters I just got giddy. I had the perfect paper for a monsters inc frame...except....a while back I went to a crop where you can sell stuff and for some insane reason I decided to sell these little felt monsters. GASP what was I thinking? The best part though is my friend Natalie actually bought them and she is also a scrapbooker (errr hoarder) and so I texted her and told her the wonderful baby news and asked her is she still had those stickers. She said yes!!! Wahoooo!!!!


So I got to make my name frame and I love how it turned out. I decided to go with a 12 x 12 because the background paper is from a level 1 kit and already had that cute blue on there and so I just measured out each of the squares.

Then I popped a few of them up. I also decided I would add his details to some of the other squares. It just all came together really quick.


I made a cute card using the Artfully Sent Cricut Cartridge. Here is the inside. I kept it pretty simple. They loved the gift and I had to hand deliver it...ya know so I can get some more sweet baby time. Oh how I just love newborns.


Thursday, July 24, 2014

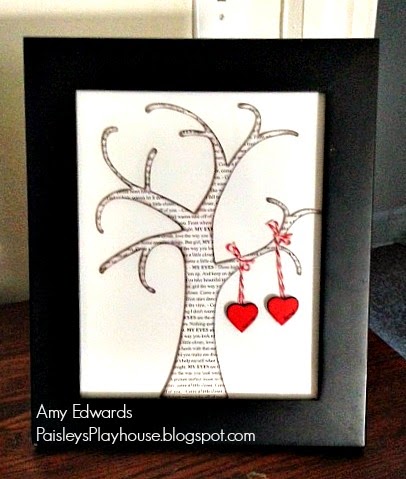
L-O-V-E Lyric Tree

I was looking for something that I could make for an anniversary gift and so naturally I went to Pinterest and did some searching. Well boy did I ever hit the jackpot!!


I found this adorable "Two Little Lovers Sitting in a Tree" project. How perfect is this? I knew right away that I just had to make it. The best part TheDatingDivas also have very detailed instructions so that you can make one of your own if you like.
 
Once I picked out the song I wanted to use I cut out the image on my cricut...after looking up Tree's. There really are so many tree's out the in cricut land!
 
Wait until you see the adorable anniversary card I made to go with it C-U-T-E cute cute!!!
 
I have a long weekend...so hopefully I will finish up a few of the projects that I have in the works and show them to you in a day or two.
Until then...


Wednesday, January 16, 2013

Name frame...twins


Ok so as you read a few weeks ago when you saw Jordan's name frame we had a little baby boom. All of these births were super exciting and joyful times. I was so happy for my cousins as they each welcomed new babies into their lives. I was doubly excited for the last announcment and she was having TWINS now we always joked about having twins in my family as my aunt who is a geneoligist told us how twins showed up here and there in the family but none of us ever had any...until now. A perfect set - one boy and one girl. They are just the sweetest little babies. When I got to hold both of them together it made me thankful that I only had one at a time.

I was really trying to think of what paper I could use for twins who share a room for my cousin who has always been a tom boy. Do I want them to match do I want them separate...I dicided to coordinate using a paper pack that is fun for kids and can be for a boy or a girl. Animal Cookies! Many years ago I entered the wrong code and ended up with a second set of this paper. I thought about getting rid of it but figured I would just keep it. Well I am SO glad I did cause it is just perfect for this project. See it isn't so bad to hoard your supplies for that some day...some day happened to me!

Here they are together


I wanted to make them coordinate but not be the same. I used a few different papers and My Stickease for each frame. First up the little boy frame.


Next up the little girls frame. I added a banner to this one. I just love to use banners. I hope this trend sticks around next year.


Here they are all finished together. She loved them. I loved them. I cannot wait to make more of them! Such a great fun gift that can be personalized. My daughter who is getting married later this year informed me that I will need to make her some when she decides to start having babies.

You can see the other name frames here Jordan, Eli, Maizie.

Tuesday, January 8, 2013

Name Frame: Eli

Time for another name from. Last week you saw Jordan and you can see my original one Maizie. This one is for my cousins little grandson Eli he had a short name so I had to get a little creative on how I wanted to do it.
 
Funny sidenote. As I was trying to decide how and what to do and what paper I wanted to use. I accidently sent the message to my cousin instead of my friend! Ack...I told her to disregard as that was for a suprise...lucky for me she still had no clue. Now I try and double check who I am sending stuff too.
 
This superhero paper was my favorite paper pack for a while just because it was so different. I don't even have boys but I knew I had to have it! I never did make a scrapbook page with it. I made several cards and a really cool wreath for the 4th of July. I was digging and digging and digging some more and found a sampler pack. I was so happy because I thought it would just be perfect for little Eli.


Thursday, January 3, 2013

I made another Name Frame: Jordan

We had a slight baby boom in the family this year. I have a lot of cousins and three of them who happen to be sisters all had babies appear in their life over the past year or so. I decided to make some name frames for them. I will do three separate posts and will start out with the oldest and work my way through them.

I just adore these name frames and made one a while back for my daughter.

Jordan is the oldest of the babies I decided to go with a space theme for him. I had a super cute paper pack from way back when called Stardust. I also had the coordinating My Stickease and little embellishment that had a rubber feel to them. I also added some bling.


Monday, September 24, 2012

Christmas Countdown - Week 1 Heart 2 Heart

Hi everyone did I really just say Christmas? I did...it is twelve weeks until Christmas so I thought it would be fun to start making some projects each week. Heart 2 Heart also thought of this awesome idea. As a matter of fact that is what today's challenge is all about. Go check it out right now!

I thought it would be some fun affordable items that you can keep on hand.


Monday, August 6, 2012

Artiste - Day 6

Booties...that is what we are posting today. Hopefully you have come from Kathy's Creative Corner if you are starting here that is ok too just hop around until you end up here again and you will know that you have seen all the cute projects.

Ok so back to the booties. I have been seeing these adorable things on line for years. I never had the guts to cut them out by hand and make a pair. I always wanted to and guess what? CTMH has made it possible. I cannot tell you how many adorable 3-D items are on this cartridge and how many of them were on my list of someday. Well today is now and here are my little booties -

I hope you are enjoying our hop and seeing that you to can be an "artiste" and make all of these creations.

Hope on over to RoxyBonds blog and see her adorable project for today. If for some reason you get lost along the way don't forget that all of the hoppers are along the right side of my blog.

See you all tomorrow!

Sunday, July 8, 2012

Twice in one day...

is unheard of I know. First I don't post for ever and ever and now a double header. I couldn't help it my mojo is back. It is my last vacation day today and I want to clean the house and get laundry done so instead I am scrapbooking. Bwa ha ha ha! 

I also have been meaning to participate in real time over at Sketch-n-Scrap not just doing the sketches after the fact. This weeks sketch had to be posted today so I sat down and got busy. Have you played along over there yet? The sketches are awesome so go give it a chance you will be glad you did.


I cannot tell you how happy I am to be creating again. I used the Dotty for You paper pack that CTMH gave away during National Scrapbook month. I thought it was fun playful and colorful...sort of like sidewalk chalk! I followed the sketch pretty close I just changed out the photo size. I was going to turn it but this way ended up working for me.


Here is a close up of the butterflies. When I was showing my little one she said awwww then I touched one of them and then of course she had to do it too. She said "I wanna make the butterfly fly" it was so sweet. 

Well what are you waiting for...grab the sketch and enter your page. They have great monthly sponsors as well so you might even win a prize. If not you will have another page done and a cute one at that.


Monday, July 2, 2012

Stars...stars...and more stars

Last year I saw a wreath with all stars on pinterest for Christmas and I decided I needed to make one for the 4th of July. Well guess what...I never got any farther than making a few stars and gluing the stars down to the wreath. When I moved I saw it mocking me and I thought to myself maybe I will finish it. That was that. Well then my daughter mocked me and I knew I just needed to finish what I started over a year ago even if we only get to enjoy it on our door for two days. 


If you want to make on for yourself I will show you how. First I took a chipboard circle from CTMH and cut out these blue stars to adhere the stars on. In the original 


I decided that I didn't like the way it looked with the stars I had done so I added some more paper rosettes  and I thought the super hero paper from CTMH would be perfect! Well that paper was perfect and I love how the rosettes turned out. When making rosettes you want to take a strip of paper that is 1 3/4" x 12" and then score it every 1/4" then fold it back and forth.


Then they will look more like this.


Glue the ends with adhesive and they look sort of like little cups.


Push the center down and add some very strong adhesive. I used a glue gun. It also helps if you hold it together with a circle. It just makes it stronger. I do this to both sides.


Now I was ready to stick everything down to my wreath...but...I am a stickler for colors and making sure they match. Well guess what my original stars didn't match. I tried to pretend they did but in the end I knew it would but me every time I hung up my wreath so I decided to make some more stars. This is actually good for you as now you can see how I made the stars as I didn't have photos from the ones I made a year ago.


I cut out my stars with my Art Philosophy cartridge on my Cricut. Once you have your stars you will want to score each on from tip to inside tip. Once you do that on each one you fold the stars up so they look like this.


Once I did that I just layered the rosettes and the stars. I also added some little spirals, buttons and bling. I stuck everything down with a glue gun and love the way it turned out. 


I hope you enjoyed the project and if you start one please know that it only took a few hours to complete so it really shouldn't take you a whole year to make it. 


I finally have great timing on a seasonal project and am super excited to have just made this project only to find out that I can share it over at Exploring Cricut and over at Heart2Heart. I hope you can also play along at one or the other...or even better BOTH!


Supplies
Cardstock -  Blue for the base that I had on hand. Cranberry - CTMH
Pattern Paper - Superhereo
Other - Art Philosophy Cartridge, Bling, random buttons